Atelier Bonryu(E)
infrared photography


Atelier Bonryu(E)
infrared photography


Laboratory: Infrared Photography
Remark #7 Infrared Color Film Type False Color
Overview of Infrared Color Film Type False Color: An infrared color film is composed of three layers just like a conventional color film for visible light. In the infrared color film two of the three layers detect visible light and the other layer detects infrared light (Remark#1). The three layers from the surface of the film to the inside detect infrared, green, and red light, in this sequence, and the color of these layers become red, blue, and green after development. As the colors of the infrared, the green, and the red lights incident to the film are expressed as red, blue, and green, respectively, we see a photograph of the unnatural color completely different from the color of the object. This unnatural coloration was called “false color” in a document on an infrared color film of Kodak for the first time.
For a single digital infrared photograph this processing cannot be carried out because all the image data recorded in the three channels R, G, and B of the single digital infrared photograph are due to incident infrared light and no visible light contributes to form an image of the photograph.
To create a false color photograph of this type, therefore, it is necessary to use two photographs taken by infrared and visible lights, and an infrared color film type false color photograph is made by combining these photographs according to the following procedure.
1) Take an infrared color photograph and a visible light photograph of the same object by the same camera at almost the same time.
2) Extract an image of the G channel of the infrared color photograph (Gir), and images of G and R channels of the visible light photograph (Gv and Rv).
3) Create a single photograph by combining the above three images (Gir, Rv, and Gv) as those of output channels R, G, and B of the final photograph.
Concrete Procedure to Create False Color Photograph: As an image processing software to create a false color photograph we use Photoshop CS6 (pay-ware) or GIMP 2 (freeware). These two softwares have almost the same functions for our purpose and both can be used satisfactorily. However, as there are some differences in the procedures by the two softwares we describe the concrete procedures for both the softwares to create the infrared color film type false color in the following.
{Photoshop CS6}
1)Open two files, i.e., an infrared color photograph and a visible light color photograph: “File” > “Open...” (infrared photograph), and “File > Open...” (visible light photograph)
2) Arrange the two photographs in a window: “Window” > “Arrange” and choose an arrangement, then the infrared color photograph and the corresponding color photograph by visible light are displayed in the same window (Fig.R7-1)
3) Select the infrared color photograph
4) Select the G (or B or R) channel in the channel panel (for the infrared photograph)
5) Read the G channel into the clip board: “Select” > “All”, and “Edit” > “Copy”
6) Select the visible light photograph by clicking it
7) Select the R (or G or B) channel in the channel panel
8) Transfer the G channel of the infrared photograph to the R channel of the visible light photograph (Fig.R7-2)
9) Click “RGB” in the channel panel, then a final image is obtained (Fig.R7-3)
In addition, if there is misalignment between the infrared and the visible light photographs, correct the position of an image transferred from the infrared photograph as follows.
10)In the right channel panel (panel for visible light photograph) select the channel transferred from the infrared photograph to make it active
11)Click the other channels to make them visible, and increase the magnification large to make the photograph easily viewable(Fig.R7-4)
12)By the move tool adjust the position of the image of the infrared photograph with the visible light photograph (Fig.R7-5,6)
13) A false color infrared photograph is completed (Fig.R7-7)
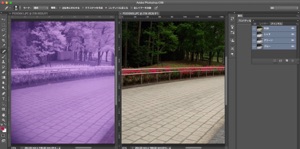
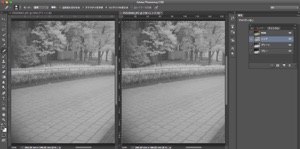
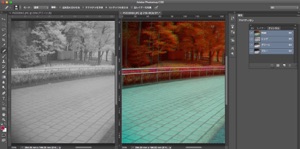
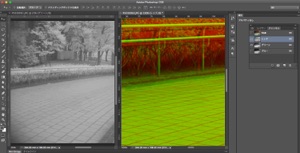
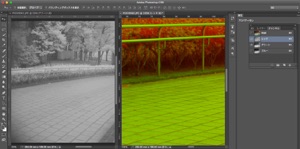
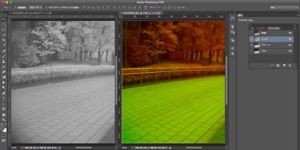
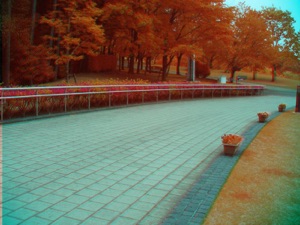
Fig.R7-1 An infrared photograph and a visible light photograph are arranged in a window. (Step 1, 2)
Fig.R7-2 Transfer the G channel of the infrared photograph to the R channel of the visible light photograph. (Step 3-8)
Fig.R7-3 The right photograph (the visible light photograph) becomes a composite photograph of the infrared and the visible light photographs. There is a slight misalignment between the images of R and G,B channels.
Fig.R7-4 The magnification factor of the right photograph is increase in order to make it easily viewable.
Fig.R7-5 By using the move tool adjust the position of the (active) R channel with respect to the position of the G, B channels of the visible light photograph.
Fig.R7-6 The misalignment between the infrared and the visible light photographs ic corrected.
Fig.R7-7 Make all three channels of the right photograph visible with colors and the false color photograph is completed.
{GIMP 2.8}
For an infrared color photograph and a visible light color photograph a false color photograph is created similarly by using GIMP. The concrete procedure is described in the following.
1)Open a file of a visible light photograph: “File” > “Open/Import ...” a visible light color photograph
2) Decompose the photograph to images of R, G, and B channels: “Color” > “Components” > “Channel Decomposition” with RGB decomposition to layers checked (Fig.R7-8).
3) Select the top channel in the channel panel (R channel is activated) (Fig.R7-9).
4) Open the infrared color photograph as a layer: “File” > “Open as Layers...”. At the top of the channel panel A grey-scale layer of the infrared color photograph appears (Fig.R7-10).
5) Make this layer and another layer viewable.
6) Set the opacity to 50% and increase the magnification factor to make both the infrared and the visible light photographs viewable (Fig.R7-11).
7) By using the move tool reduce the misalignment between the photographs if any.
8) If the above operation is carried out adjust the layer with the image size: “Layer” > “Layer to Image size”
9) Compose the channels to create the final false color photograph: “Color” > “Components” > “Channel Composition”
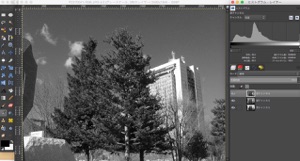
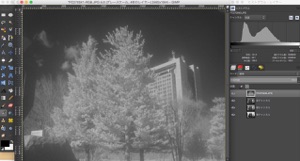
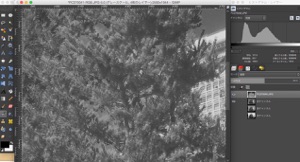

Fig.R7-8 Open the visible light photograph and decompose it to channels (Step 1,2).
Fig.R7-9 Activate the R channel of the visible light photograph (Step 3).
Fig.R7-10 Open the infrared photograph as a layer (Step 4).
Fig.R7-11 Correction of the position between the visible light and the infrared photographs.
Fig.R7-12 The final false color photograph.
