Atelier Bonryu(E)
infrared photography


Atelier Bonryu(E)
infrared photography


Laboratory: Infrared Photography
Remark #8 Channel Swapping in the RGB Color Space
The method to process an infrared color film type false color photograph is described in Remark #7, but it is a rather heavy restriction to take two photographs by the same camera by changing external filters within a very short time. Especially, it is not possible, as a matter of course, to take a moving object and process the photographs by this method. Therefore, it may be desirable to process a single infrared color photograph to finish a false color infrared color photograph. Typical method for such processing is “the channel swapping in the RGB color space”. There are various possibilities to process an infrared color photograph by the channel swapping. But usually the complete exchange of the image data between the R and B channels, in which the image data of the incident channels R and B are transferred, respectively, to the output channels B and R, is employed.
It is desirable that white balance of an original infrared photograph is appropriately set at shooting but even a photograph taken under AWB (auto-white balance) setting can be processed fairly well in many cases. Setting of white balance for the infrared photography is carried out by bringing foliage into the whole field of view of the camera and setting the “one-touch white balance”. During the post-processing the white balance can be adjusted by “auto-correction of white balance” or “level adjustment” as described in the following.
{Photoshop CS6}
1) Open the infrared photograph to be processed: “File” > “Open...”
2) Carry out color adjustment if necessary: “Image” > “Auto Tone”, and/or “Image” > “Auto Color”
3) Select Channel Mixer: “Image” > “Adjustment” > “Channel Mixer”
4) Set “Red” for the output channel, and set 0 % for “Red”, 100 % for “Blue” in the source channels.
5) Set “Blue” for the output channel, and set 100 % for “Red”, 0 % for “Blue” in the source channels.
6) Click “OK”
7) Save the processed file: “File” > “Save As...”.
{GIMP 2.8}
1)Open the infrared photograph to be processed: “File” > “Open...”
2) Carry out color adjustment if necessary: “Color” > “Auto” > “White Balance”
3) Select Channel Mixer: “Color” > “Components” > “Channel Mixer”
4) Select “Red” for the output channel, and set 0 % for “Red”, 100 % for “Blue” in the source channels (Slider).
5) Select “Blue” for the output channel, and set 100 % for “Red”, 0 % for “Blue” in the source channels (Slider).
6) Export the processed file: “File” > “Export As...”.
Figure R8-1,2,3 show the original infrared color photograph, the false color photographs processed by Photoshop CS6 and GIMP 2.8, respectively.
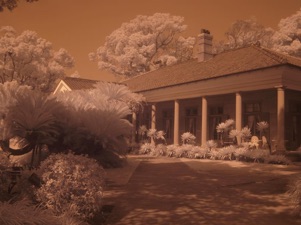
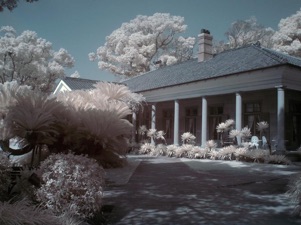
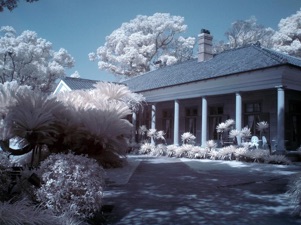
Fig.R8-1 Alt House in Glover-Garden, Nagasaki
The original infrared color photograph.
Olympus E-620 (converted), ISO=200, T=0.004 sec
Fig.R8-2 Alt House in Glover-Garden, Nagasaki
The false color infrared photograph processed by Channel Swapping of Photoshop CS6
Fig.R8-3 Alt House in Glover-Garden, Nagasaki
The false color infrared photograph processed by Channel Swapping of GIMP 2.8
In the above examples, the false color photograph processed by GIMP is brighter and whitish in comparison with the photograph processed by Photoshop CS6. However, it is not a general tendency of these softwares, but the difference is considered due to other adjustment process.
