Atelier Bonryu(E)
infrared photography


Atelier Bonryu(E)
infrared photography


Laboratory: Infrared Photography
Remark #9 Tone Inversion in the CIELab Color Space
In this page we describe the method to complete a false color infrared photograph by the tone inversion in the CIELab color space. We skip a detailed explanation of the CIELab color space but it should be noted that in this color space (3-dimensional space with L, a, and b directions) the L direction denotes the brightness of a color and other two directions a and b are independent of the brightness of the color. The variables a and b represent the change of color red (a>0) to green (a<0) and the change from yellow (b>0) to cyan (b<0), respectively, where green and cyan are complementary colors of red and yellow. Therefore, the tone inversion means the conversion of a color to the complementary color. And, moreover, in the CIELab color space the geometrically defined distance between two colors is consistent with the perceptual distance between the two colors. Because of this fact inversion of the variables of a and b creates a photograph made of the complementary colors of the original photograph, which may give us beautiful and favorable impression.
{Photoshop CS6}
1) Open the infrared photograph to be processed: “File” > “Open...”
2) Carry out color adjustment if necessary: “Image” > “Auto Tone”, and/or “Image” > “Auto Color”
3) Select CIELab color mode: “Image” > “Mode” > “Lab Color”
4) Carry out color adjustment if necessary: “Image” > “Adjustment” > “Level”
5) Select “a” in the channel panel and invert the tone of channel “a”: “Image” > “Adjustments” > “Invert”
6) Select “b” in the channel panel and invert the tone of channel “b”: “Image” > “Adjustments” > “Invert”
7) Click “Lab” in the channel panel. Composed image appears.
8) Change the color space from the Lab color space to the RGB color space.
9) Carry out color adjustment if necessary: “Image” > “Adjustment” > “Level”
10) Save the processed file: “File” > “Save As...”.
{GIMP 2.8}
1)Open the infrared photograph to be processed: “File” > “Open...”
2) Adjust White Balance: “Color” > “Auto” > “White Balance”
3) Carry out channel decomposition in the CIELab color space: “Color” > “Components” > “Decomposition...”, check the boxes of “Lab” for color model and “decomposition to layers”
4) Activate “A” in the channel panel
5) Invert the tone of “A” channel: “Color” > “Invert”
6) Activate “B” in the channel panel
7) Invert the tone of “B” channel: “Color” > “Invert”
8) Compose the channels: “Color” > “Components” > “Compose...”, check the box of “Lab” for color model, and click “OK”
9) Export the processed photograph: “File” > “Export As...”
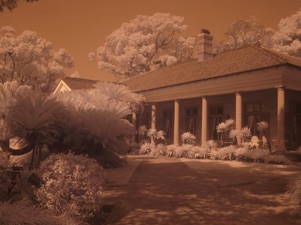
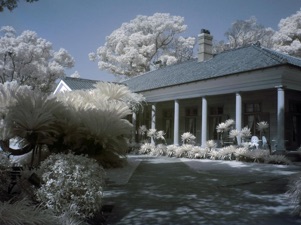
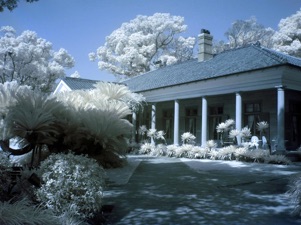
Fig.R9-1 Alt House in Glover-Garden, Nagasaki
The original infrared color photograph.
Olympus E-620 (converted), ISO=200, T=0.004 sec
Fig.R9-2 Alt House in Glover-Garden, Nagasaki
The false color infrared photograph processed by Tone Inversion in CIELab color space of Photoshop CS6
Fig.R9-3 Alt House in Glover-Garden, Nagasaki
The false color infrared photograph processed by Tone Inversion in CIELab color space of GIMP 2.8
